Entering Checks
To enter checks into the Lockbox System:
1) Click "Lockbox". Then "Enter Lockbox Checks", then
2) Then click New in the Lock Box Buffer.
(We strongly recommend using a MICR check reader. Using a MICR check reader
prevents data entry errors and will save time. Swiping a check through
a MICR check reader automatically enters the Rtn/ABA#, Account# and Check#
.)
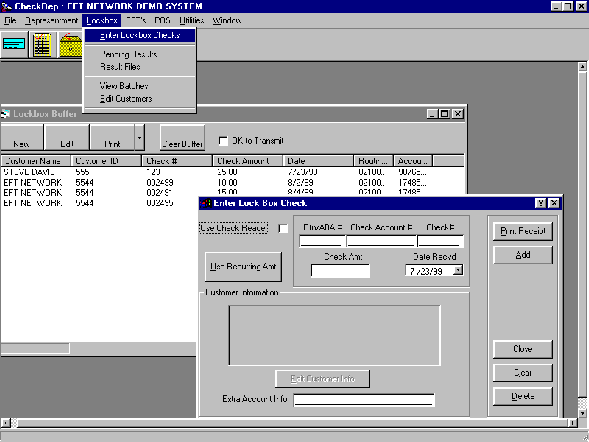
Check Amount: Enter the amount of the check or use the reoccurring
amount if desired.
Extra Account Information: Used for invoice or bill numbers. This
information will be printed on the receipt.
Print Receipt: Prints a receipt for the check issuer to sign accepting
your check acceptance policy.
Actions
Print Receipt: Prints a receipt or a notification
letter for the current check.
Add: Add this check to the Check Buffer.
Close: Close the check entry window (if no data exists,
click X at top left of window).
Clear: Clear all information in the Check Entry screen.
Delete: Deletes the check from the Check Buffer. (Only used
when editing a check.)
As checks are entered into the Lockbox system they will add to the Lockbox Buffer. To transmit, click "OK To Transmit" in the Lockbox Buffer. (Then see Chapter 3, page 1.)
Printing the Lockbox Buffer. Once you are finished entering checks, you
may sort the Lockbox Buffer by clicking the title bar of the column you
wish your report to be sorted by. After the checks have been transmitted
to our host system, you are able to reprint the report from the View Batches
option under the Lockbox menu. next
page